
A lot of the confusion around GATE 2027 Registration comes down to DigiLocker becoming mandatory this year, which changes the form more than most candidates expect. Instead of describing the GOAPS form in general terms, this post goes through it screen by screen, with a screenshot for every step, so you can match what you see on your own screen to what actually shows up.
Every screen you will come across during GATE 2027 Registration is covered here in the exact order GOAPS presents it. Read it once before you sit down to apply, since GATE 2027 Form Filling now works differently from previous years and a wrong click early on is harder to undo later.
GATE 2027 Registration and Form Filling: Common Mistakes, Detailed Steps to Fill & More
Before you open the portal, it helps to have the surrounding basics sorted, whether you actually meet the GATE 2027 Eligibility Criteria, what a complete GATE 2027 Documents Required checklist looks like, and why DigiLocker verification is mandatory before GOAPS lets you past the login screen. Once those are in place, the rest of GATE 2027 Registration is mostly about following the sequence correctly, which is exactly what the sections below walk through.
What You Need Before You Start GATE 2027 Form Filling
GATE 2027 Registration is built around DigiLocker, so most of the preparation happens outside GOAPS itself. Keep these ready before you begin:
- An active DigiLocker account with a verified email address, this is checked before you can proceed at all.
- A mobile number linked to your DigiLocker/Aadhaar that can still receive OTPs, an inactive number blocks sign-in.
- A folder named “GATE2027” created inside your DigiLocker drive, since the portal expects one for any documents you upload later.
- A stable browser window you will not need to close or refresh mid-process, GOAPS explicitly warns against this during identity verification.
- A recent color photograph and signature scan ready in the specified size, plus your category or PwD certificate if applicable.
- Your qualifying degree, college, discipline, and year of study details on hand for the Degree section.
If your DigiLocker isn’t verified yet, sort that out first, no part of GATE 2027 Form Filling moves forward without it.
GATE 2027 Registration Process Step-by-Step Guide
This is the exact GATE 2027 Registration process on GOAPS, broken into individual steps with a screenshot for each screen.
Step 1: Open the Login Page and Choose DigiLocker
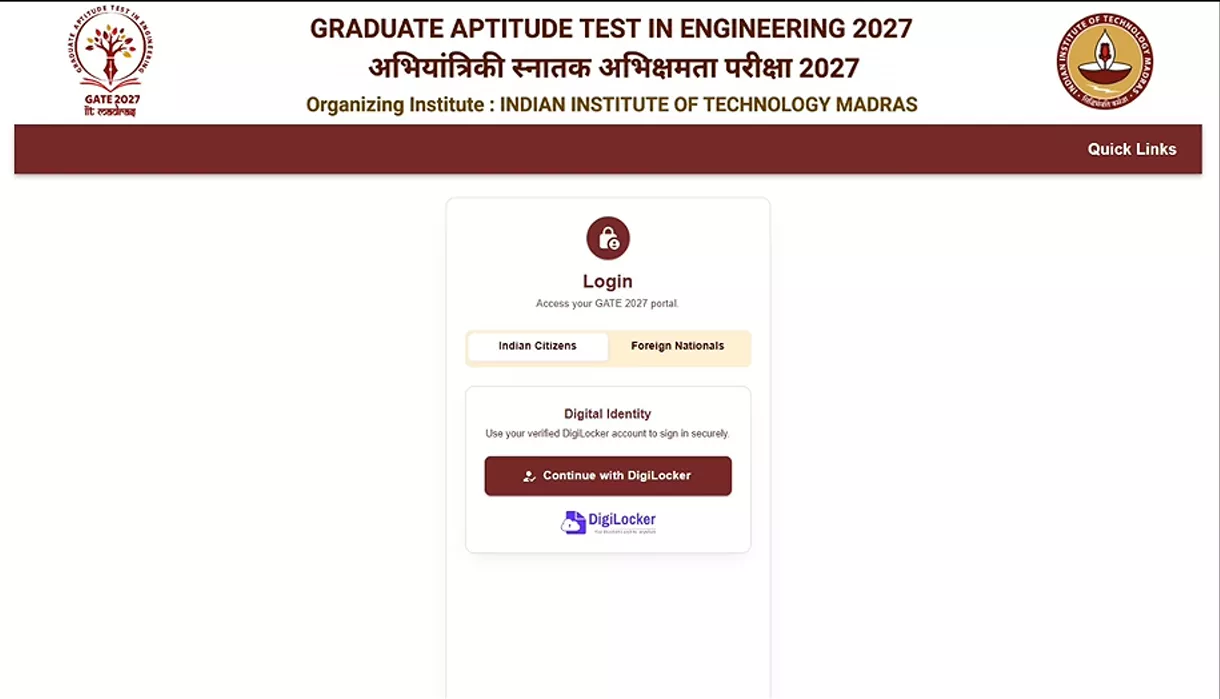
The GATE 2027 Registration portal opens on a simple login screen with two tabs, Indian Citizens and Foreign Nationals. Indian candidates should stay on the first tab and click “Continue with DigiLocker” under Digital Identity, this is the only sign-in method GOAPS offers this year, there is no separate username-password registration.
Step 2: Read the DigiLocker Setup Instructions Carefully
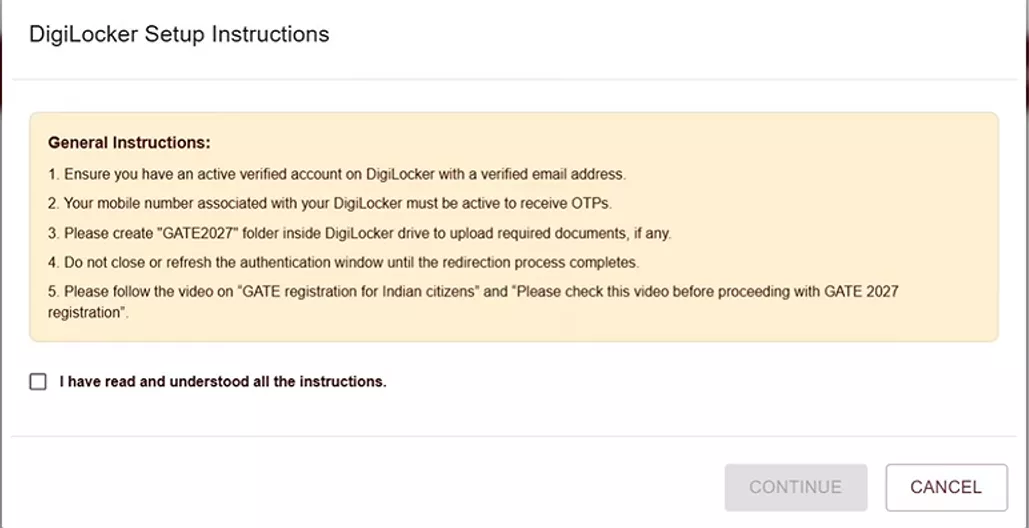
Before GOAPS lets you continue, it shows a checklist popup: an active verified DigiLocker account with a verified email, an active mobile number for OTPs, and a folder named “GATE2027” created inside DigiLocker for your documents. Tick “I have read and understood all the instructions” only once these are genuinely true, ticking it without meeting them is exactly what causes GATE 2027 Form Filling to fail a few screens later.
Step 3: Sign In Through DigiLocker’s Meri Pehchaan Screen
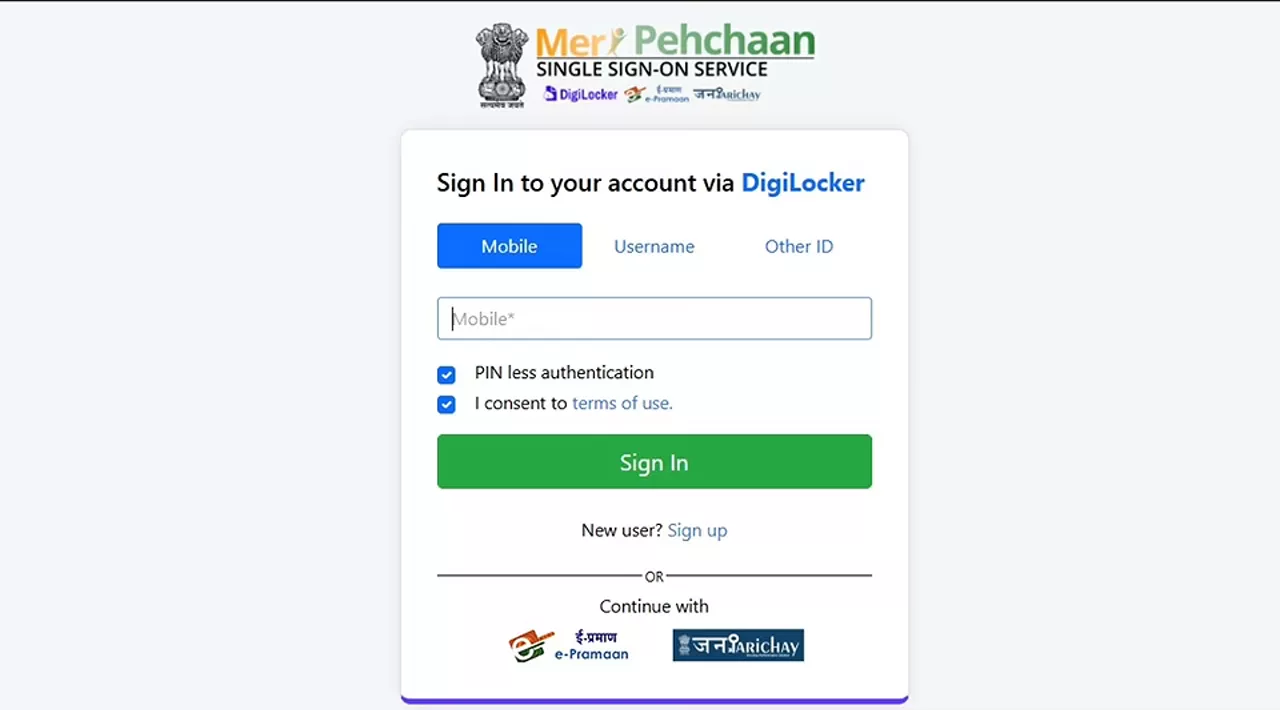
Clicking continue takes you to DigiLocker’s “Meri Pehchaan” single sign-on page. Sign in using your mobile number, username, or another registered ID, then verify the OTP sent to your registered mobile and email. This step confirms your identity independently of GOAPS before your GATE 2027 Registration can proceed, so use the same DigiLocker account you actually verified, not a second or newly created one.
Step 4: Give Consent to Share Your Documents
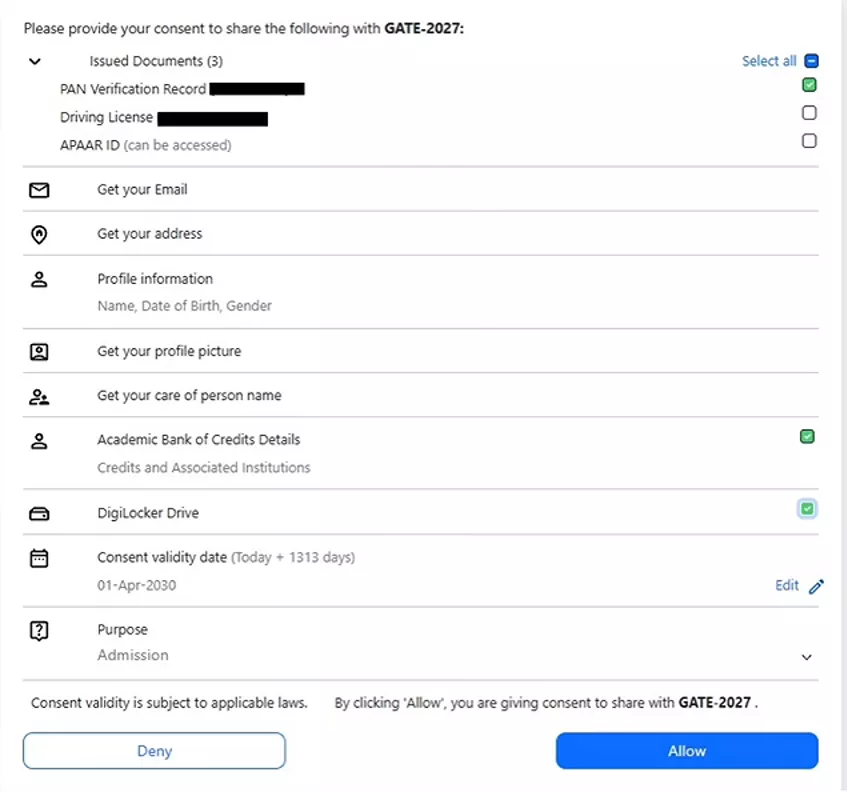
Once signed in, DigiLocker asks for consent to share specific data with GATE 2027, your PAN verification record, driving license, Academic Bank of Credits details, profile information, address, and profile picture among them. Grant access to at least one valid, verified document, and set the consent validity to 3 years, a shorter validity can force you to repeat this step of GATE 2027 Registration during the correction window later.
Step 5: Accept the Declaration on Your Application Homepage
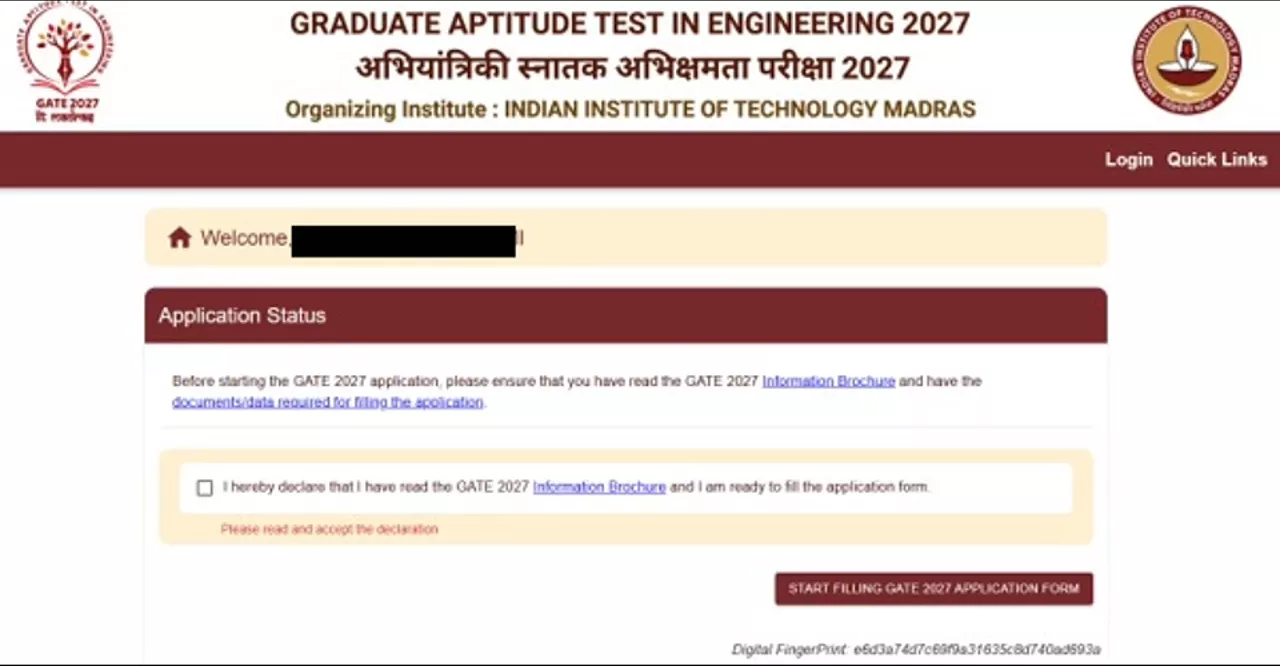
After consent, you land on your GATE 2027 Registration homepage showing your Application Status. Before this screen lets you proceed, confirm you have read the GATE 2027 Information Brochure and gathered the documents/data required, then check the declaration box. The “Start Filling GATE 2027 Application Form” button stays active only after the checkbox is ticked, which is where a surprising number of candidates get stuck simply because they skipped reading it.
Step 6: Complete the Upload Documents Section
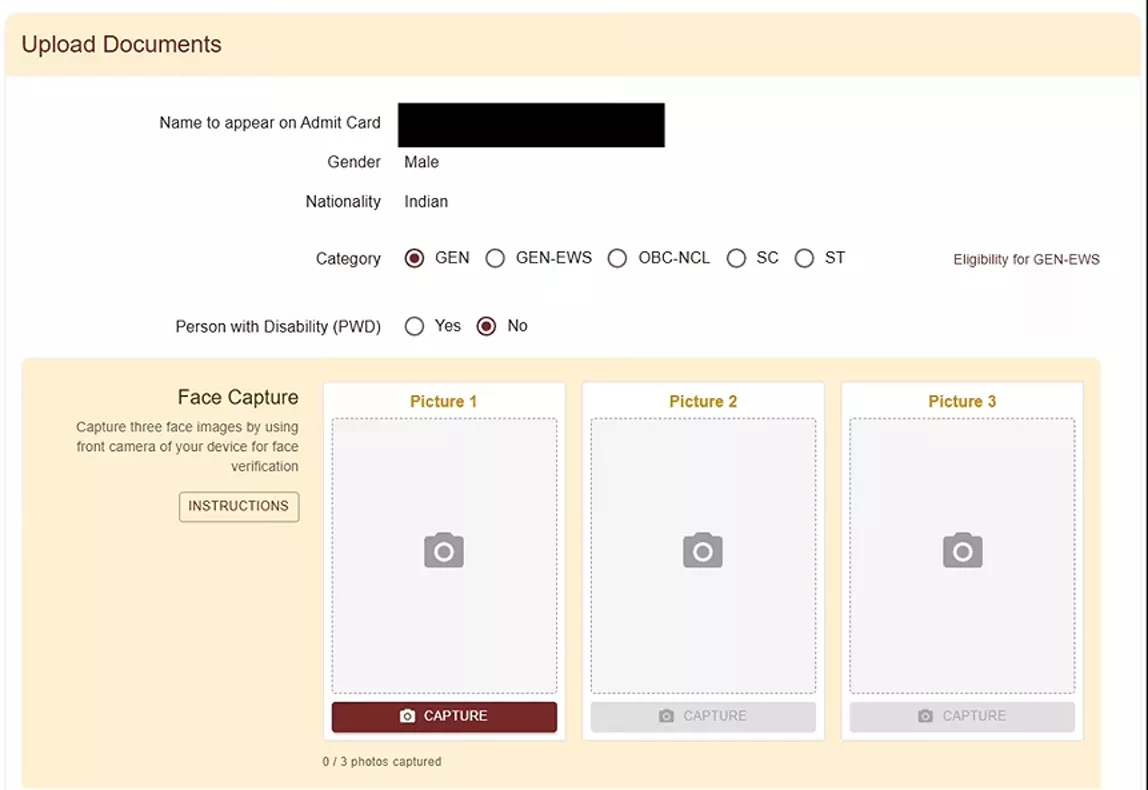
The form opens on the Documents tab. Your name, gender, and nationality appear already filled in, pulled straight from DigiLocker, so check them against your certificates rather than assuming they’re correct. Below that, select your category (GEN, GEN-EWS, OBC-NCL, SC, or ST) and your PwD status, both drive which fee and reservation rules apply to your GATE 2027 Registration.
Step 7: Complete the Live Face Capture
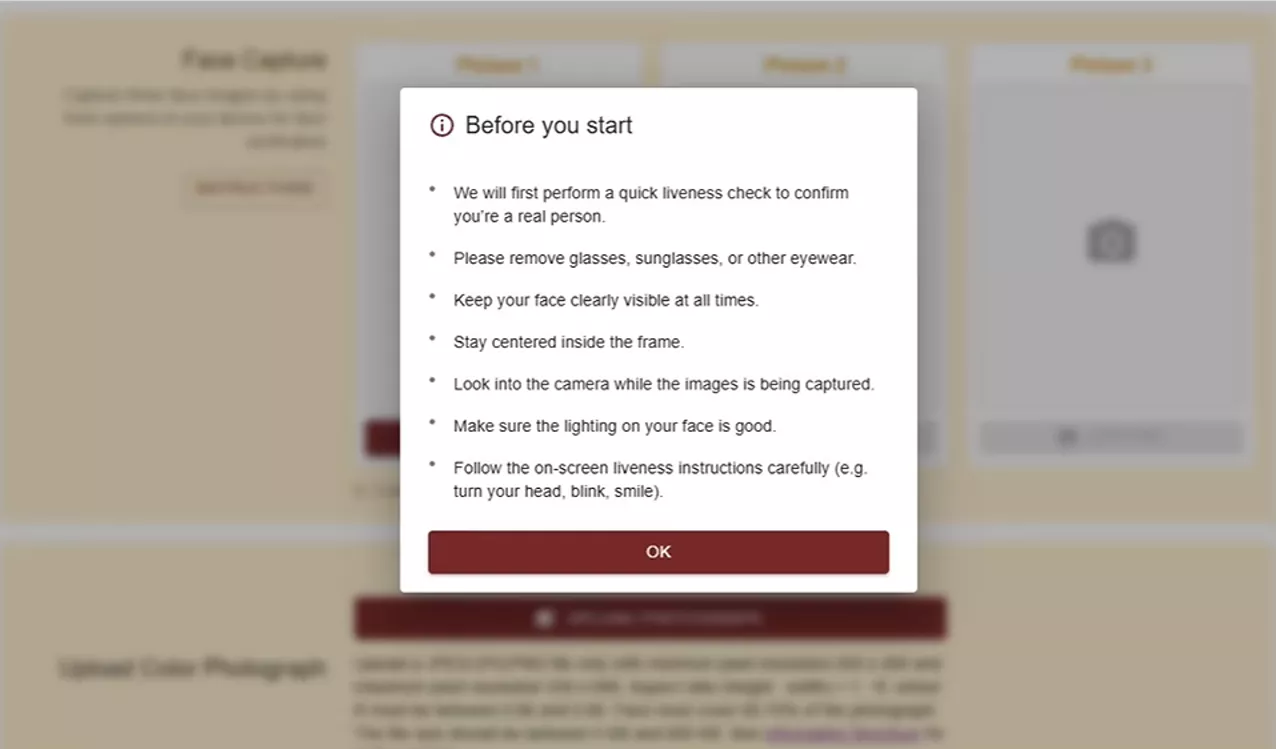
The same screen asks for three face images using your device’s front camera. Before it starts, GOAPS shows a “Before You Start” checklist, remove glasses or sunglasses, keep your face centered and clearly visible, ensure good lighting, and follow on-screen liveness instructions like turning your head, blinking, or smiling. A device with at least a 5-megapixel camera, ideally a phone, gives noticeably fewer retries at this step of GATE 2027 Registration.
Step 8: Upload Your Color Photograph and Signature
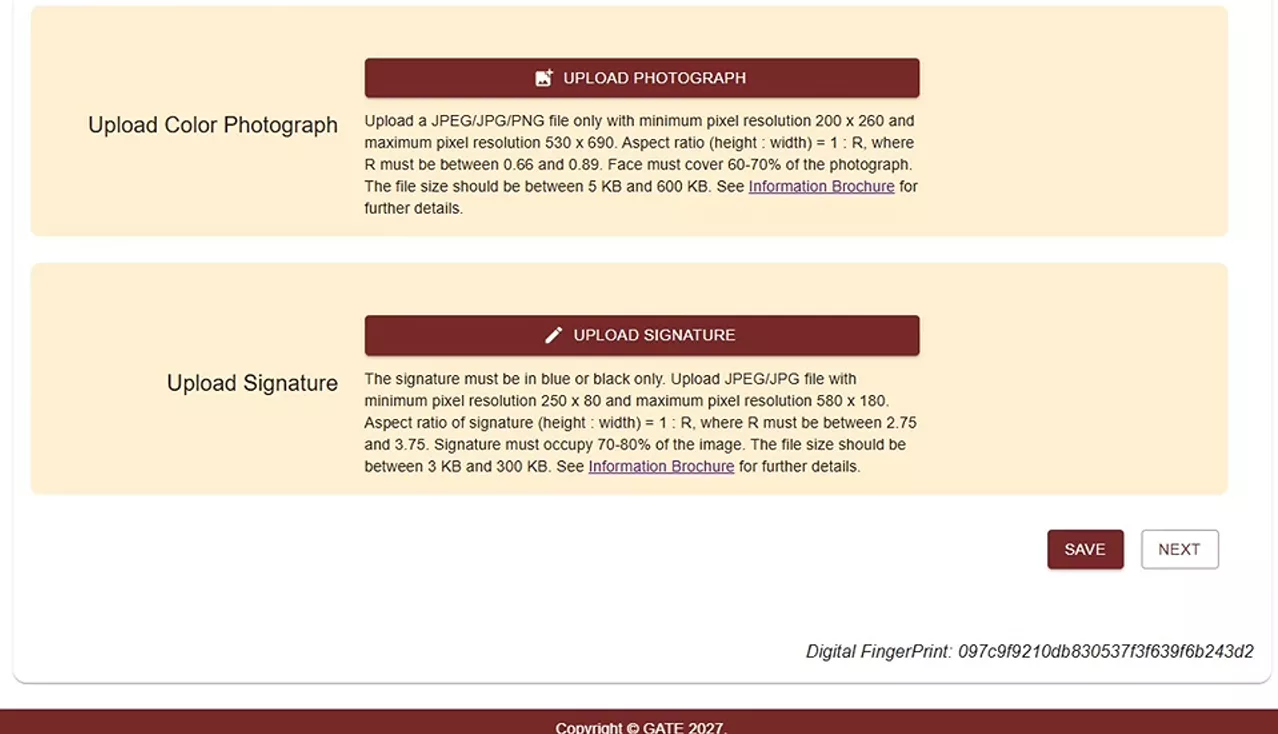
Next, upload a JPEG, JPG, or PNG photograph with a resolution between 200×260 and 530×690 pixels, sized between 5 KB and 600 KB, with your face covering 60–70% of the frame. Your signature must be in blue or black ink only, uploaded as JPEG/JPG between 250×80 and 580×180 pixels and 3–300 KB, occupying 70–80% of the image. Both have exact aspect-ratio ranges listed on this screen, so check the numbers rather than eyeballing the crop.
Step 9: Fill In Exam Details, Papers and Exam Cities
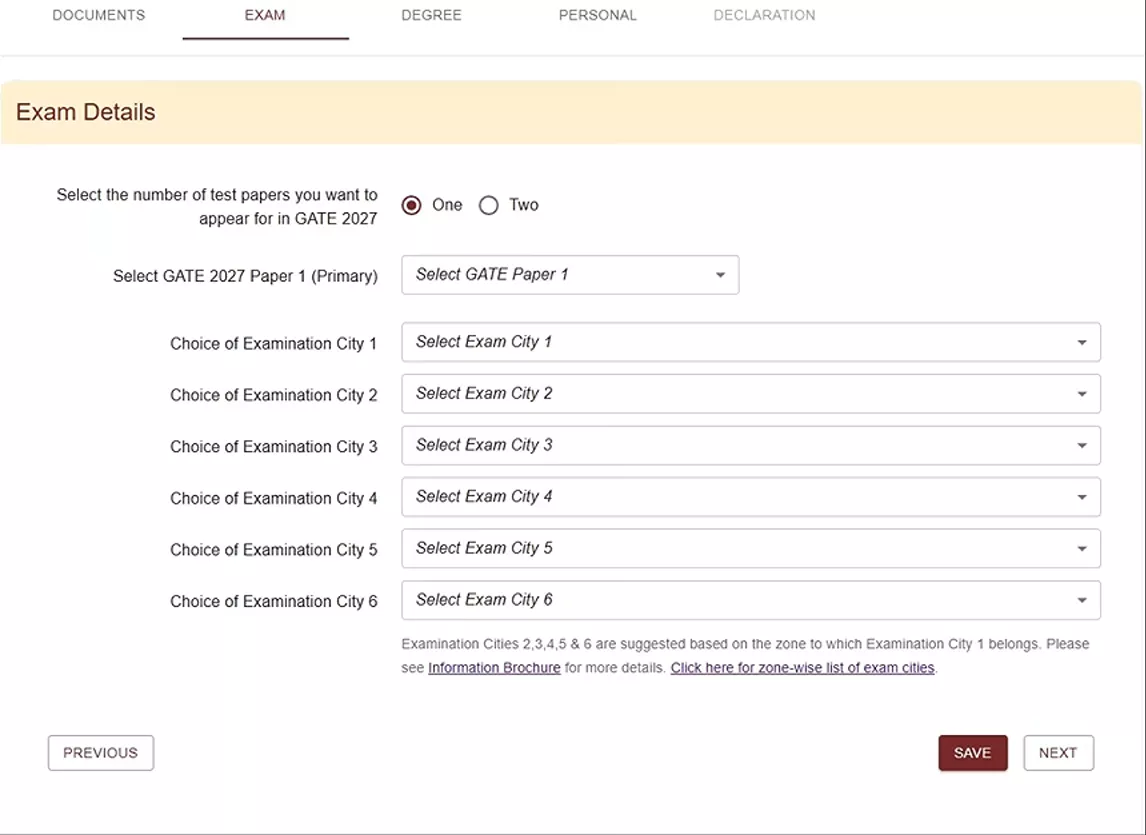
On the Exam tab, choose whether you’re appearing for one or two test papers, then select your primary paper (and second paper, if applicable) from the dropdown. Below that, pick six exam city preferences, cities 2 through 6 are suggested automatically based on the zone your first city choice belongs to, and mixing cities from a different zone simply won’t save, so pick your first city carefully during GATE 2027 Registration since it locks the rest of the list.
Step 10: Enter Your Qualifying Degree Details
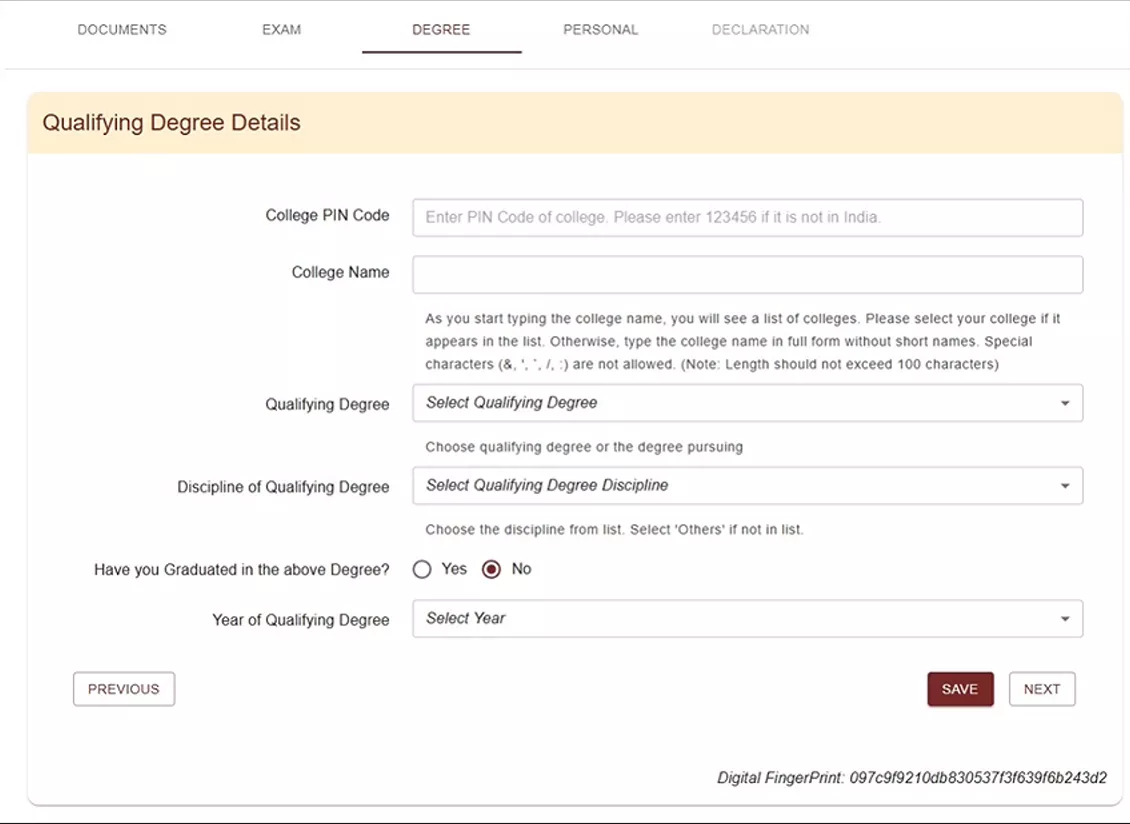
Move to the Degree tab of your GATE 2027 Registration and enter your college’s PIN code (use 123456 if your college isn’t in India), then start typing your college name, a list appears as you type. If your college doesn’t show up, type its full name without abbreviations, special characters like & or / aren’t accepted here. Follow this with your qualifying degree, discipline, whether you’ve already graduated, and your year of study or graduation.
Step 11: Complete the Personal Details Section
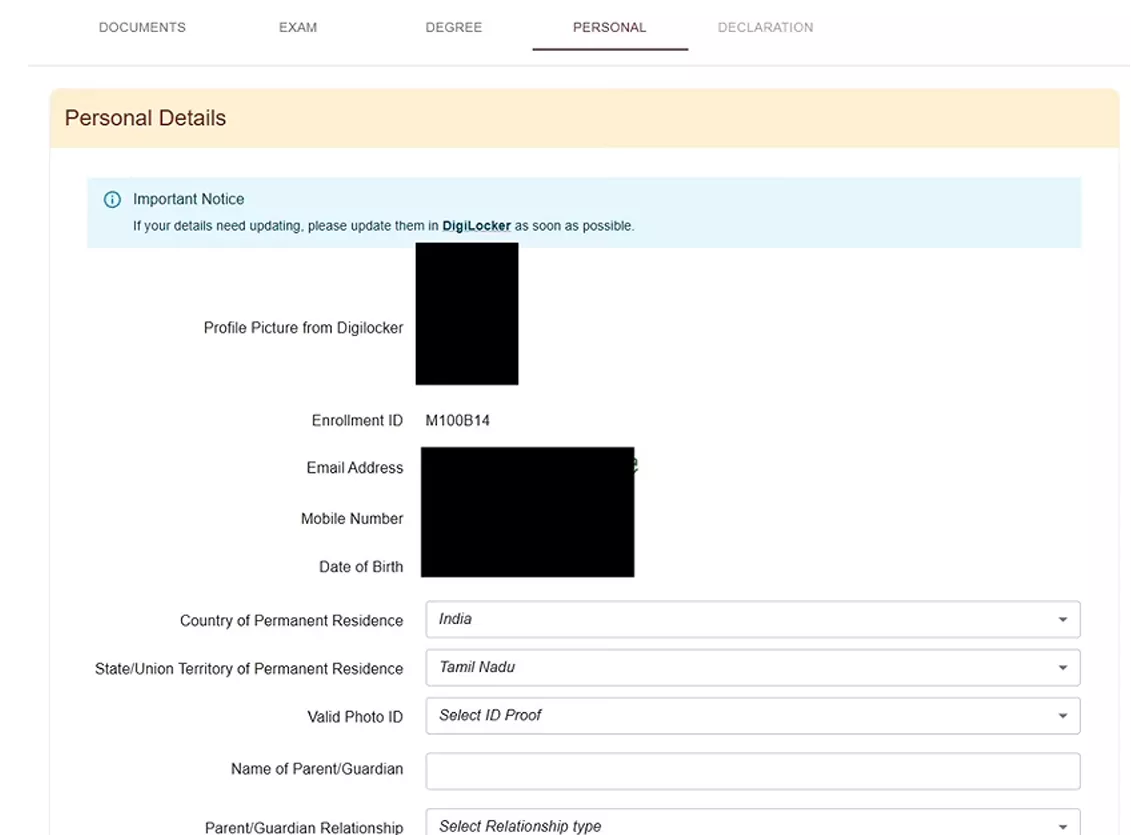
The Personal tab of your GATE 2027 Registration auto-fills your profile picture, enrollment ID, email, mobile number, and date of birth from DigiLocker, along with your country and state of residence. You’ll still need to select a valid photo ID and enter your parent or guardian’s name, relationship, nationality, and mobile number manually, since DigiLocker doesn’t carry that information.
Step 12: Verify Your Address and Click View Application
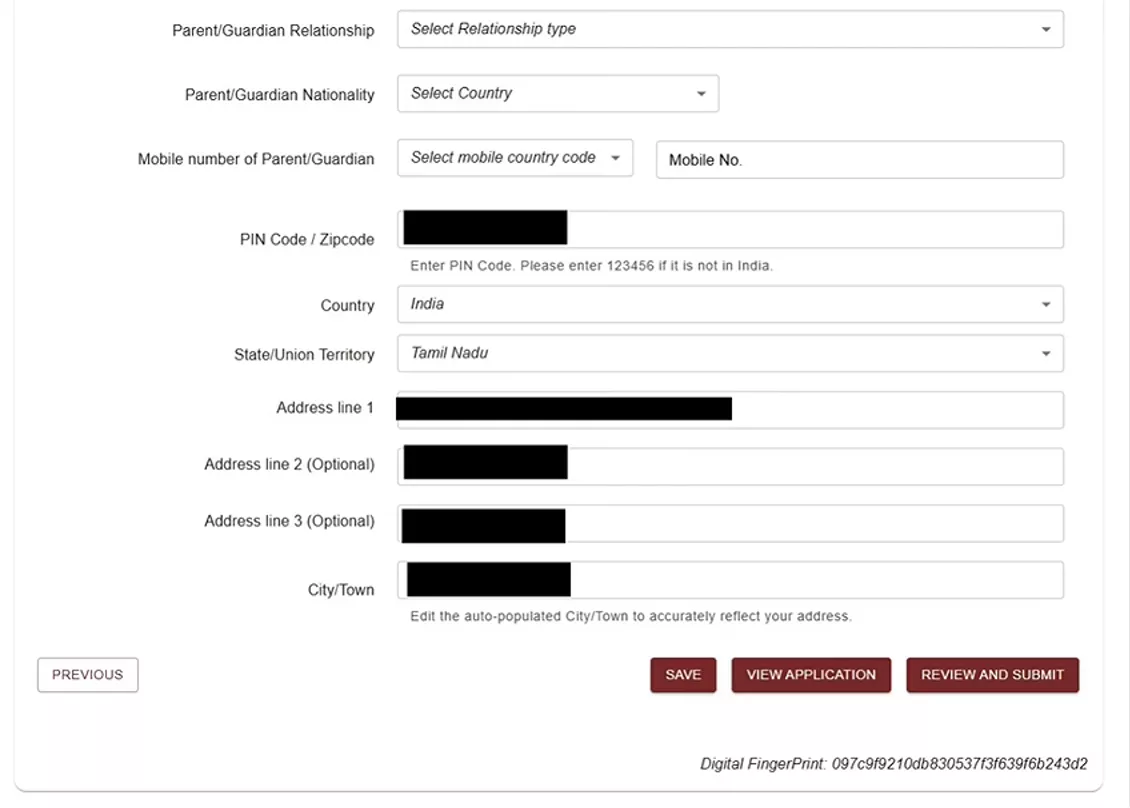
Scroll down on the same tab to your PIN code, country, state, and address lines, all auto-populated from DigiLocker. Edit the City/Town field if it doesn’t accurately reflect your address, then click “View Application” to see your complete form exactly as it will be submitted, this is your last real chance to catch a fetched-but-wrong detail before it becomes part of your official GATE 2027 Registration.
Step 13: Accept the Declaration, Verify, and Submit
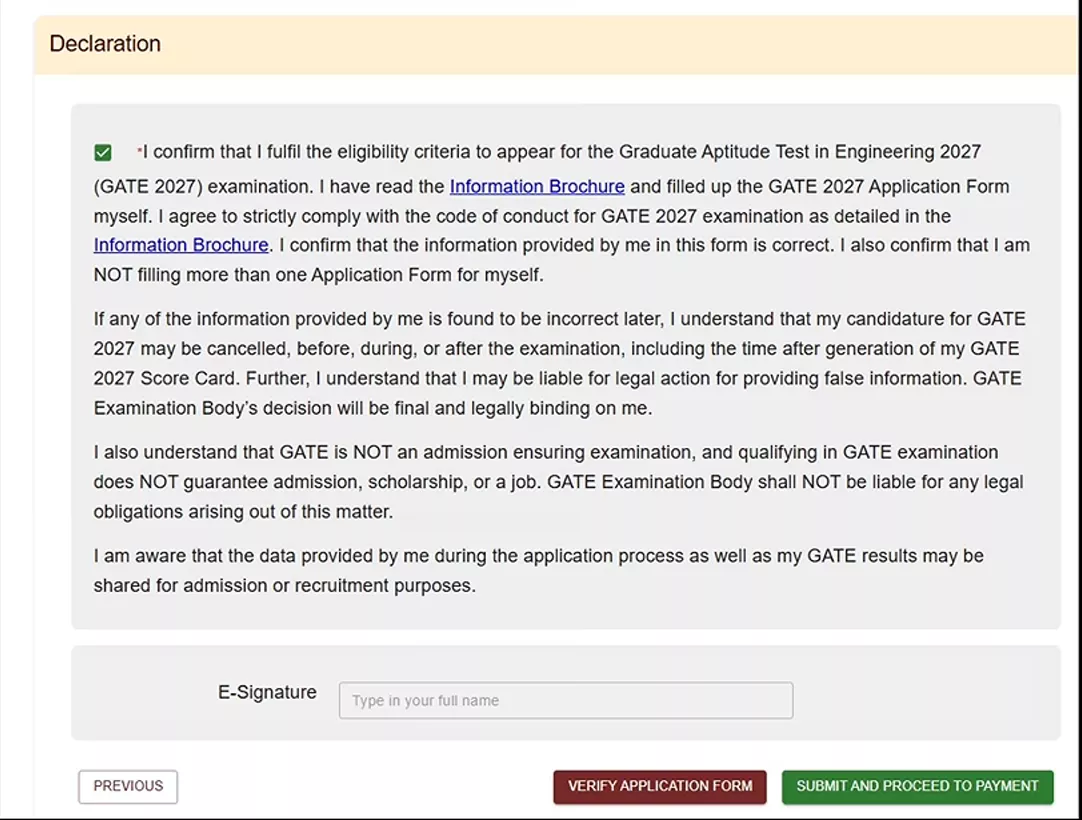
On the Declaration tab, read the eligibility and code-of-conduct statement, tick the confirmation box, and type your full name as an e-signature. Clicking “Verify Application Form” lets you download a PDF copy of your filled form, worth keeping for your own records. Once you’re satisfied, click “Submit and Proceed to Payment” and follow the steps shown on the payment page to complete your GATE 2027 Registration.
GATE 2027 Form Filling Common Mistakes That Delay or Block Your Application
Most GATE 2027 Form Filling problems trace back to a handful of avoidable errors, not to anything actually broken on GOAPS. Here’s what to watch for at each stage:
| Common Mistake | Why It Causes a Problem |
|---|---|
| Unverified or inactive DigiLocker account | GOAPS checks for an active, verified account with a verified email before letting you past sign-in, an unverified one blocks you immediately. |
| Skipping the “GATE2027” DigiLocker folder | The setup instructions specifically ask for this folder for uploading documents later, missing it can cause upload errors mid-form. |
| Closing or refreshing the browser mid-verification | GOAPS explicitly warns against this during the DigiLocker authentication window, doing it can break the identity-linking process. |
| Setting a short DigiLocker consent validity | A validity shorter than the recommended 3 years may expire before your correction window or admit card stage, forcing you to redo consent. |
| Not verifying auto-filled name, DOB, or address | Details are fetched directly from DigiLocker, if your DigiLocker record has an error, it carries straight into your GATE 2027 Registration. |
| Wearing glasses or poor lighting during face capture | The liveness check needs a clearly visible, centered face, eyewear or dim lighting increases failed attempts and retries. |
| Uploading a photo or signature outside the pixel range | Both have strict minimum and maximum resolution, aspect ratio, and file-size limits, files outside these get rejected on upload. |
| Mixing exam cities from different zones | All 6 city preferences must belong to the same zone as your first choice, GOAPS won’t save a mixed list. |
| Typing an abbreviated college name | If your college isn’t in the suggested list, GOAPS asks for the full name without short forms, abbreviations can get flagged during verification. |
| Submitting without clicking “View Application” first | Skipping this final check means auto-fetched errors go straight into your submitted GATE 2027 Registration with no chance to catch them beforehand. |
Most of these come down to one habit, read every instruction popup on screen instead of clicking past it during GATE 2027 Registration, since GOAPS tends to state its rules right before the step where they matter.
What Happens After You Submit the GATE 2027 Registration Form
Once payment on the GOAPS page goes through, your GATE 2027 Registration is complete for now, save the confirmation and the PDF you downloaded during the Verify Application Form step, you’ll need your application number for every step after this, including tracking your allotted exam city and eventually downloading your admit card. If you notice an error after submitting, most GATE cycles open a short correction window a few weeks later, though fields fetched directly from DigiLocker typically have limited or no correction scope, which is exactly why getting the Personal and Documents tabs right the first time matters more than it might seem while you’re filling them in.
FAQs on GATE 2027 Registration and Form Filling
Is DigiLocker compulsory for GATE 2027 Registration?
Yes. GOAPS offers no username-password sign-up this year, every Indian candidate must complete GATE 2027 Registration by signing in through a verified DigiLocker account and granting it consent to share identity and academic documents.
What is the GATE2027 folder mentioned in the DigiLocker instructions?
It’s a folder you’re asked to create inside your own DigiLocker drive before starting GATE 2027 Form Filling, meant for storing any documents the portal may ask you to upload during the process.
Why does my name or address look wrong on the GATE 2027 form?
Your name, date of birth, address, and photo are auto-fetched from your DigiLocker/Aadhaar record. If any of these are incorrect, update them in DigiLocker first, since GOAPS pulls this data directly rather than accepting manual retyping.
How many face images does GATE 2027 Registration require?
Three. The portal captures three live face images using your device’s front camera as part of a liveness check, following on-screen prompts such as blinking or smiling.
Can I pick exam cities from two different zones in GATE 2027?
No. All six of your exam city preferences must fall within a single GATE zone, based on your first city choice. GOAPS does not allow saving a list that mixes cities from different zones.
What should I do before clicking Submit and Proceed to Payment?
Click View Application first to review your complete GATE 2027 Registration form exactly as it will be submitted, then use Verify Application Form to download a PDF copy for your records before making the final payment.